This series of articles on some of the benefits of emulation was considered for the most part after I first used the utility PPM2BBC on the PC. It is a utility that probably few of you will have heard of, buried away in a far corner of The BBC Lives web site with the most spartan of descriptions. Yet the possibilities it offers to "spruce up" games and magazines such as EUG with artwork and loading screens are infinite. The pages of EUG have lamented before that designing screens on the BBC series machines is a process fraught with difficulty. PPM2BBC does nothing more nor less than convert screens designed on your PC into screen files that can be loaded into a BBC or Electron emulator. From this point on, naturally enough, you can use FDC to write the files to a bona fide Elk disc then load them into the real thing!
Now I could personally rave for England about how much work this utility can save. I designed numerous EUG openers before I discovered it and, because of the fiddlyness of using Art Packages on the BBC/Elk, would first design the screen on an Amiga then divide it up into 8 x 8 CHR$ blocks, print these out and then input each to the Electron as a VDU 23 statement. The result: an Amiga screen on an Elk! But with 40 blocks to a line and 31 lines to a screen, 'converting' in this manner would take a whole day's work, not to mention a great deal of printer ribbon! A complicated screen such as the "Toy Story 2" opener to EUG #50 would take an hour to design on the Amiga using Deluxe Paint 3 but then twelve hours to transfer to the Elk! At the time I searched in vain for a way to 'pass' the screen through a cable from Amiga to Electron but, unsurprisingly, as no-one had ever done it before, no-one could help.
I stumbled across PPM2BBC whilst looking for something else entirely and did not appreciate how it could be exploited to bring Electron owners a myriad of new screen designs until I had become fully versed in using ElectrEm, BBC Explorer and FDC. Not until one fateful afternoon did all the pieces of the puzzle fall into place and, immediately they did, there was an urge to set out just how the transfers could be achieved. Sadly, you've all had to wait until now for the article. This was because, without introducing all the utilities associated with ElectrEm emulation one by one, my previous attempts to explain PPM2BBC from scratch floundered - all the extrinsic information on each particular utility's idiosyncracies distracted the reader from the 'thread' of the narrative.
By now though, assuming you've been following this series on emulation, you will have experimented with FDC, ELECTREM and BBC Explorer and should find PPM2BBC only a little more difficult to use. OK? Get it here (from The BBC Lives) or here (from The Acorn Electron Haven) then and unzip it to a folder called 'ppm2bbc' on your hard drive then!
As is the norm, the best place to start with the utility itself is its name.
What's A PPM?
PPM stands for Portable Pixel Map and, as you might have guessed, a filename on the PC with a '.ppm' suffix is a type of picture file. If you're more than a beginner to the world of the PC then you'll know that there are many 'types' of picture format; the most popular being '.jpg', '.gif' and '.bmp'. Logically then, if these are the most popular then '.ppm' files are less popular. In fact, it seems '.ppm' files are extremely unpopular and even doing an internet search on '.ppm' only brings a few results. Fortunately this is of no consequence to us as I will explain shortly. The rest of the name (PPM2BBC) is self-explanatory now we know what the utility does: i.e. it converts PPM pictures to (2) BBC.
So Where Do I Find PPM Files?
As noted above, .ppm is not a popular picture format. So, to transfer most PC pictures to a BBC/Elk therefore, another utility is required before even starting to use PPM2BBC. Namely, an Art Package that can save pictures in the .ppm format. That way you are not just restricted to converting the few .ppm files "out there" but can convert all picture files by simply loading them in their original format, be it .jpg, .bmp or whatever, then saving them in the .ppm format. The best tool for this job is the amazing and free Irfanview which you can get from www.irfanview.com and which is child's play to use.
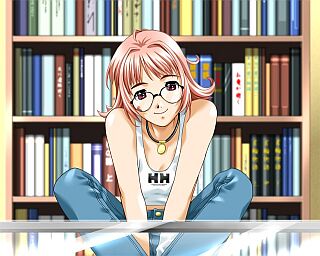 A sample .jpg image found on the internet |
An Amiga Computer Can Be Handy At This Point Too!
There is another reason why I cannot recommend Irfanview highly enough - not only does it support all the picture types previously mentioned, it also supports many others including (Fanfare of trumpets, please) ".iff" pictures, those created on an Amiga. Now this is probably a personal thing so anyone who has no plans to bring an Amiga into their use of PPM2BBC, please feel free to skip this, and the next seven paragraphs. However, to those who believe the Amiga sports Art Packages that have never been bettered on any other computer and are curious about converting from Amiga to PC, then here are the secrets of how to do it.
Firstly, design your masterpiece on your trusty Amiga. The Amiga screen size is identical to a Mode 1 or Mode 4 screen size on a BBC/Electron so you can see exactly how the screen will appear 'full-size' as you design it. If you have additional hardware such as a Digitiser or Screen Thief, you can poach and play around with still images from video tapes or Amiga games as well. Bear in mind that you will be limited in the number of colours. Finally, save the screen to an Amiga disk with a short filename plus the .iff suffix, for example 'PIC1.IFF'
Now, wouldn't it be nice if there was an Amiga equivalent of the FDC program? Sadly for us Amiga owners, there isn't and my limited research into the Amiga emulation scene has revealed that creating 'images' of Amiga disks is a long, expensive and tortious process. But searching 'www.google.com' for any answers on getting that .iff file on the Amiga disk into a format whereby it could be recognised by Irfanview revealed it was possible by means of an Amiga utility known as MESSYDOS. A quick search of my library of Amiga disks and an equivalent utility (DOS2DOS) was unearthed.
Apparently, although Amigados (DOS = Disk Operating System) and Msdos (MS = Microsoft) are very different operating systems, both have the capability to write a file to the other. So it is perfectly possible, if you have a suitable DOS utility on the Amiga to transfer an Amiga file to a PC disk. On the DOS utility I found on Marty's Utility Disk, you are simply asked "Device to output to?" to which the answer is df1 (disk drive 1) and then "Command?" to which, after inserting a formatted PC disk in drive 1 and the Amiga disk containing 'PIC1.IFF' in drive 0, the input 'copy pic1.iff' results in a whirr of activity from both drives and hey presto you have 'PIC1.IFF' on a disk you can load into IRFANVIEW - all in a matter of seconds!
That's all very well for you, might be your reaction to the news of this utility, but what if when *I* search my collection of Amiga utilities, *I* haven't got a utility like that?! I admit that that is a problem. As far as I can tell from the Amiga websites, it is still impossible to download Amiga disk 'images' and transfer them to a real Amiga. So even if I could find a website offering Marty's Utility Disk (which I can't!) for download then you would still have the problem of not being able to get the image onto a physical Amiga disk.
Fortunately there is a solution: just write to EUG with your postal address and I will send you a copy on Amiga disk. A word of warning though: Amigas cannot write to HD disks, only MD ones. So you need one of the 'older' 720k PC disks (or if you like, a disk without the "HD" symbol in the corner or "another Amiga disk") to transfer the .iff file to. You need to pre-format such a disk differently on your PC - if operating through Windows, click the notch altering the disk size from 1.44Mb to 720k. I have designated one disk in my collection THE PPM2BBC SHUTTLE DISK for this purpose to avoid difficulty.
Phew. That all got a little bit complicated, didn't it? So let me recap on all of this preparation before actually going on to use PPM2BBC (Yes,we haven't even used it yet!) in steps: Firstly, What To Do On Your Amiga:
- Design a gorgeous loading screen using Deluxe Paint 3; Remember to observe colour restrictions;
- Save the screen to a spare disk; Give it a short filename with the suffix ".iff";
- Reset the Amiga and load a utility such as MESSYDOS or DOS2DOS;
- Place the Amiga disk containing the screen in df0;
- Place a *720k* formatted PC disk in df1; (NB. It doesn't need to be blank, just formatted correctly);
- Enter the requisite commands to copy the file across;
- Remove the disk from df1 and insert in into your PC.
OK. I've Designed A Screen. Now What?
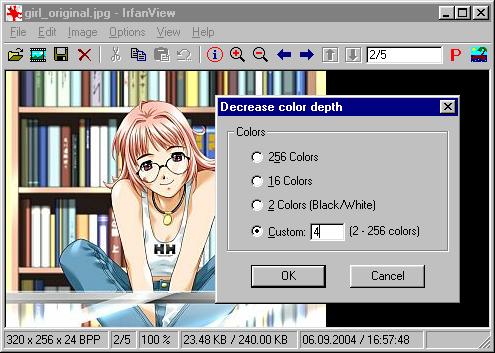
Let me welcome back those who are designing their Beeb/Elk screens on a PC at this point and elaborate on the Irfanview procedure we now need to go through. Firstly, the picture file needs to be loaded and the number of colours double-checked. Irfanview has a useful command in its pull-down menus here: "Decrease colour depth". In the "Custom" box that appears when this is selected, you should type the number of colours appropriate to the Mode the screen will be converted to. (For example, 4 colours in Mode 1.) If you've designed the screen with this limitation in mind, this option will cause no change in the picture displayed at all. With pictures 'grabbed' from cyberspace or, for example, photographs, this option will decrease the quality considerably. This is only to be expected though - you can't expect PC quality on an Electron, can you?
The next step is a bit odd but is 100% necessaary for PPM2BBC to correctly recognise the 'true colours' of a picture you have designed. You must return to the "Edit" menu and select "Edit palette".
A window will show the colours that are present in your picture (typically red, green, white and black). Each of these colours must be rendered a 'true' colour. As you will appreciate, there are different shades of red, green, etc. PPM2BBC, when it operates, looks at the individual shade of each pixel in the Pixel Map it is converting and 'maps' it to an approximate "dithering" of BBC colours. Now while this is fine for photographs, what you do not want if you have designed a picture with basic filled in areas of, say, green and white (e.g. the "Toy Story 2" opener) is for the 'green' and 'white' to be "dithered" with say 'black' and 'red' pixels. If the 'green' and 'white' colours are not 'true' colours this is what PPM2BBC will attempt to do to replicate the "shade" of the original picture. The designs can then appear with a 'striped' effect.
Click on each colour in turn and ensure it has one or more of its RGB values at full (Number 255) and the others at 0. Black will be 0, 0, 0; White 255, 255, 255; Red 255, 0, 0; etc. If one of the colours forming your picture is not 'true' then select one of the other colours in the window to replace it. Don't worry if this means that, for example, you have to map bright yellow over dark green. Once the picture is correctly converted to a BBC/Elk screen, you can restore the colours you originally worked by the use of VDU 19 commands!
Nothing more is necessary now except to select 'Save file as' and select 'Portable Pixel Map (.PPM)' in the 'type' box. Always save to the same folder as you unzipped the PPM2BBC utility to. This saves a lot of time in the long run.
PPM2BBC runs in DOS mode so you need to be aware of the following commands (which I wasn't!) before being able to use it: cd .. (moves you 'up' in the directory 'tree'), ch <directory name> (moves you to a sub-directory of the one you are currently in). If calling the Msdos prompt from Windows, you usually begin in the 'Windows' directory and so will need to type 'cd ..' (ENTER), 'cd ppm2bbc' (ENTER). The commands in the PPM2BBC User Guide will now be available to you.
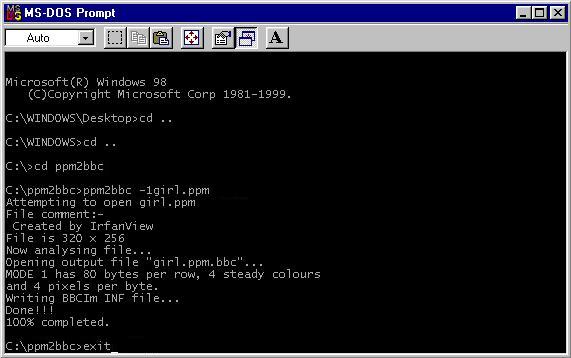
The documentation for PPM2BBC is, ahem, as you might expect but is in fact reasonably clear. The command ppm2bbc -1pic1.ppm (ENTER) will convert the .ppm file to a Mode 1 screen; the command ppm2bbc -2pic1.ppm (ENTER) to a Mode 2 screen and so on. Nothing too complex about that then and a quick 'exit' command will take you back to Windows.
The Last Run
Now for the last run - Open Windows Explorer and, inside the ppm2bbc folder you will find a .bbc and a .bbc.inf file which should be familiar to you from the article discussing BBC EXPLORER 2.
Open BBC Explorer, create a new disc image then "drag and drop" these files into it. Now load up ElectrEm, load this new disc image into it and *LOAD the file you have created in the usual way (e.g. *LOAD P.PIC1 3000 if Mode 1) and, if you've followed the steps correctly, you'll see that masterpiece originally designed using a professional Art Package on your Amiga or PC now gracing the screen of your Electron emulator. If it's worked then close all the utilities you've used so far and open up FDC, insert a blank Electron disc and type: 'fd0' (ENTER) 'write0 <disk image name>' (ENTER). Hey presto - your screen have been transported through the miracle of emulation from (Amiga to) PC to Electron!
One thing I have to point out now to all of you itching to get designing on your Amigas and carrying out the above procedure. When you read on a PC from a 720k disk (as you of course will do when you load the .iff file into Irfanview), one of the internal options of the disk drive is altered and FDC then starts with a different default to reflect this. It is absolutely nothing to worry about and, in truth, I don't really understand why it happens. All I do know is that an extra command is required by FDC to correct it. So if you have loaded a file from an MD disc sometime in the session preceding loading FDC, type: 'fd0' (ENTER), 'cylinders80' (ENTER) before you 'write' the disk image. Otherwise only half of the disk image is written and you'll probably end up with a picture with no bottom section.
Although the above procedure is rather longwinded, and the chain of conversion is broken if one of the utilities is missing from your collection, once you've gone through it a few times it becomes as easy as 1-2-3. The Electron has very few discs full of pictures available for it and, used correctly, PPM2BBC can bring us a lot more.
To finish with a plug, I would suggest those sceptical of the results of PPM2BBC take a look at the EUG Animeworld collection at http://www.acornelectron.com/ - all of these images were converted from Amiga pictures in just an hour. 'Drawing' them on the Electron using my previous method would undoubtedly have taken over a week and, for these sort of time-savings alone, I simply cannot fault it!