INTRODUCTION
KNITWEAR DESIGNER is a suite of five programs to design and print out knitting patterns. There are three pre-set patterns - a Raglan sleeve, a Drop shoulder, and a Square shoulder. Each of these can be altered using the Edit program, to provide special designs such as a round neck, or a totally unconventional design may be produced using the Freehand design program.
From Disc:
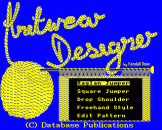
Insert the disc and press SHIFT-BREAK. You will then be presented with five options:
- Raglan jumper
- Square jumper
- Drop shoulder
- Freehand styling
- Edit a pattern
Select the option you require using the up and down arrow keys to move the highlight bar, and press RETURN to confirm your choice. Pressing BREAK while using any of the programs will return you to this menu.
From Tape:
It is essential for all tape operations that the motor control lead is connected to the tape deck. Insert the cassette, type CHAIN"" then press RETURN.
The menu will now be loaded and you can make your selection in the same way as from the disc menu.
THESE all follow the same format. The program first prompts you for inches or centimeters. Answer I or C and you will then be asked for the knitting tension in terms of stiches and rows per inch or ten centimetres.
Usually the balls of wool will carry a recommendation as to what size of needles should be used. Unless the tension is already known, cast on 30 or 40 stitches and knit up a square of 20 or 30 rows.
Measure on this sample to work out the stitches and rows per inch or centimeter. Typical values for four-ply wool on 3 and a quarter mm (number 10) needles would be stitches per inch and 9 rows per inch.
The next question is:
These programs produce a V-neck sweater: If instead you want to produce, for instance, a round-neck cardigan then you should enter Y. When prompted, tape users should insert a data tape and press the Spacebar to continue. The data will then be saved in a form that can be used by the Edit program.
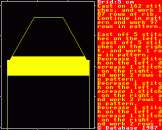
The screen now clears and you are ready to design the back of the garment. A grid is drawn on the left while a text area is set up on the right. Further prompts and output take place in the text area.
The scale of the grid is shown in the text area. Because of the limitations of drawing the grid on the screen, the programs cannot cope with very large sizes using extremely fine wool.
The first prompt is for the chest size. A certain allowance is made for the fact that sweaters are usually worn over other clothing. So, for example, giving a chest size of 38 inches will, in fact, produce a garment that is 40 inches around.
The next three prompts are for vertical measurements. Rib size is the length of the rib, usually between 1.5 and 2 inches on adults. Allowance is made for the fact that rib is usually worked on needles two sizes smaller than those used for the main tension.
The program does not specify what sort of rib is to be used, and this is left to your experience. The most usual rib is knit 1, purl 1 but any combination of knit and purl may be used for special effect.
Length to underarm refers to the total length to the armhole, including the rib. A typical value is 16 inches. This length varies according to the desired style of the garment. The program does not attempt to make any allowances for clothing worn under the sweater. Do not make the fit too snug under the armpit or the garment will probably be uncomfortable. If you are in any doubt, measure an existing garment which fits well.
In the same way Length to neck refers to the total length of the finished garment, including rib. The best place to measure is along the spine to the back of the collar. A typical value is 27 inches.
As these measurements are entered, the program draws the pattern shape. Then the grid clears and, if the printer is enabled, you will be asked:
Pressing N means that the pattern will only be displayed in the text area on the screen. For the convenience of those without printers output is halted after each screenful, so press SHIFT to continue scrolling. If you wish to scroll continuously, simply hold SHHIFT down.
Pressing Y activates the printer with the pattern output using easy-to-read Elite typestyle on Epson-compatible printers, and normal print on any other.
The pattern is produced by actually measuring the drawing on the screen. As this is usually symmetrical the pattern may, for example, instruct you to cast off three stiches on the left, cast off three stitches on the right, and knit four rows.
Obviously it is not possible to cast off on both sides of the one row, so cast off at the beginning of the first tow and work to the end, cast off at the beginning of the next row and work to the end, then work the next two rows.
Likewise the pattern may tell you to decrease one stitch on the left, decrease one stitch on the right, and work two rows. You may simply knit two stitches together at each end of the first tow, but a more usual form is knit two, knit two together through back of loop, work to last four stitches, knit two together, knit two.
Once the pattern has been displayed or printed out, you will be asked to press the Spacebar. Then the pattern shape is redrawn for the front of the garment and you are prompted to draw the neck using the * and ? keys. When the desired depth of necklice has been achieved, press Return and you are once again prompted for printout. Press the Spacebar to continue.
The pattern is displayed, and the same comments apply as for the back. There is however one important point: When the point of the V-neck is reached, the pattern instructs you to cast off x stitches on the right.
DO NOT CAST THE STITCHES OFF. Leave them on a spare needle and follow the pattern to the end. Then use these stitches and work the other side of the neck, reversing all shapings. This means that the instruction decrease one switch on the right will mean decrease one stitch on the left and so on.
The final measurement you will have to enter is the sleeve length - the total measurement from wrist to neck. The program assumes that the rib length is the same as for back and front, and works out the other measurements. The pattern shape is drawn and the pattern displayed.
If the save option has been chosen the data will be saved under the filename Pattern. Disc users can opt to keep this date by renaming the file using the *RENAME command, otherwise it will be overwritten by the next pattern to be saved.
Tape users when prompted should insert the main knitting cassette and press the Spacebar.
THE data produced by any of the three programs Raglan, Drop or Square may be edited using this program. You are first prompted for a filename. If you simply press Return the filename Pattern will be used. As before, tape users should follow the instructions given by the prompts.
Edit uses the tension set in the original program, and this cannot be altered.
The program draws the pattern shape and asks:
Pressing N leads on to displaying the pattern in the same way as the first three programs and the same comments apply.
Pressing Y enters the edit mode. A cursor cross is displayed at the first point of the pattern. Using the cursor keys this point may be moved in any direction, rubber banding the lines as it moves.
The point may be fixed in two ways: N moves on to the next point ready to move it with the cursor keys and RETURN exits from the edit mode. If N is pressed when the cursor is on the last point the program automatically leaves edit mode. You are given the opportunity to return to editing by the question:
Only if you press N does the program proceed to printout.
Suppose you wish to add an extra angle or smooth out a curve, and an additional point is needed. The procedure is as follows:
Move the cursor cross to the point before the desired addition and press I (for Insert). This inserts a point between the cursor position and the next point. Initially. however, the new point is located at the position of the cursor, and is therefore not visible. Press N to move on to this inserted point. The cursor will not move, indicating that there is indeed an additional point. This can be moved and fixed as usual with the cursor keys and N or RETURN.
You may wish to delete a point. To do this move the cursor to the point just before the superfluous point and press D. When you next press N the cursor will skip over the position of the deleted point, even though no re-drawing has taken place.
You will notice that one particular point near the shoulder is marked with an arrow. The program measures the height of the garment by this point. If you should move this point, or inset additional points, so that it is no longer the highest point of the garment, the pattern printout will be incorrect.
Furthermore, the program measures along a line drawn downwards vertically from this point, so if the marked point is positioned to the left of the lefthand edge of the rib, the program will not produce a correct pattern. Prvoided these two points are borne in mind, there should be no problem in editing any of the patterns.
When the sleeve pattern has been printed to screen or printer the program returns to the start.
THIS is a freehand drawing program. It begins by prompted for the tension in the same way as Raglan. It also asks if you wish to save the data.
The program then asks for chest size. However, unlike the first three prorgrams you do not enter a number. Instead you can use the cursor keys to draw a line. To aid you in measuring, each line on the grid, both vertically and horizontally, measures an inch (or ten centimetres) and each key-press represents a single stitch or a single row.
The cursor origin is the middle of the garment. For example, if you are designing for a 36 inch chest you will only move the cursor 9 inches. (36 inch chest means that both front and abck of the garment will be 18 inches wide. You are starting from the middle, so you will only move 9 inches, or 9 grid lines.)
Always move the cursor to the left - you can mirror it to the right later. When you draw the baseline the cursor can only be moved horizontally, so if you have a curved or ragged base you have to edit the pattern. In the same way when drawing the height of the rib, the cursor will only move vertically. Press RETURN to fix these points.
The program next asks for the height to the armhole. For a simple garment this will be a straight line drawn vertically the appropriate distance. When you press RETURN the program asks:
As there are more points in the finished design and the question is an abbreviation for Is there another point between the top of the rib and the top of the armhole?, only if that is so should you press Y. Otherwise, press N.
The next prompt is for the top of the shoulder. For a raglan sleeve you should move the cursor two or three stitches horizontally to indicate the usual casting off. This time when the Another point? Y/N appears you will press Y because you have not yet reaches the top of the shoulder. Only when the highest point of the shoulder has been drawn should you press N. The position of the cursor when you press N is taken as the point from which the program measures the pattern.
You should note that if you are drawing anti-clockwise, that is if you started off by moving the cursor to the right, you should move the cursor two or three key-presses to the left before entering N. This will ensure the computer measures the pattern correctly.
You will then be prompted for the top, which should only be drawn as far as the mid-point, which is marked by a different coloured vertical line.
When the final point of the top has been drawn you are offered the opportunity of editing the design. The same procedure is used as in the Edit program and the same comments apply.
If you do not wish to edit, or you have finished editing, the program asks:
If you press Y the design is mirrored along the mid-line. If however the design is not to be symmetrical, you should press N, in which case the program continuously prompts Another point? Y/N until you press N or until you have reached the maximum of 24 points.
You will then be asked:
This works in the same way as mentioned earlier.
When the back is finished the program reverses all the shapings of the back, and prompts Edit for front. Editing is done as described earlier. Probably all that is necessary is to edit the pattern shape to produce the neck, but this may involve inserting extra points at the appropriate place. When editing is finished the program issues the printout question as usual.
Finally the screen clears and the program asks you to draw the sleeve, returning to the menu when the pattern has been printed.
Whilst every effort had been made to ensure the accuracy of these programs, Database Publications cannot be held responsible for any errors.


