

Introduction
More than 'just' a very fast full-flight simulator, PHANTOM COMBAT offers the excitement and energy of 1,500 mph air to air combat in high resolution 3D colour graphics. This 100% machine code package has been written by a military flight simulator software engineer together with the B.A. captain who wrote the best selling 747 Flight Simulator for Doctorsoft.
A Simulator Inside A Simulator
In one of the training modes (formation mode: FORM) it is actually possible to fly the Phantom and control the enemy aircraft which can be clearly seen flying in 3D outside your fully equipped cockpit. Altermatively, a friend can pilot the target (on separate keys) while you attack.
The Adversary
Now, at last, enemy aircraft are not shown as arcade 'sprites', they are computer-drawn, navigated and 'flown' at a smooth 15 frames per second. The delta outlines reflect Soviet Mig 21 (Fishbed)/Su 15 (Flagon) performance. In combat mode (CBAT) they fight back, intelligent and dangerous.
Inside
Instrumentation is comprehensive with a wealth of clear and precise displays, featuring both analogue and digital readouts, e.g. speed in knots is shown on a dial and digitially with a separate Mach number display; radar computed target range altitude and bearing shown; target pointer and gunsight, military 'Tacan' navigation (Tactical air navigation) etc.
'Outside'
External view includes Horizon, other aircraft, a network of ground detail points, separate landing runways and animated 'strobe' approach lighting, no 'chunky' pixels; all objects are drawn in fine, high resolution coloured lines. The view is recomputed and redrawn fifteen times every second.
Air To Air Combat
Warning: There are no 'lives' but your single one, your score is zeroed and the program restarted if you are shot down or crash. This motivates you to try and 'bring home' a damaged aircraft. Many different forms of damage can occur. Most are survivable, e.g. a gear up runway landing if smooth enough. If you can't land, use the Ejection seat and survive!
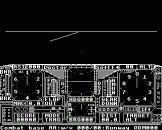
Instruments
This is the central instrument showing the pitch and roll of the aircraft (green symbol) against the horizon (white line). A blue sky marker indicates the sky portion. This instrument is the central point of your 'instrument scan'. Use it to make adjustments to your bank angle in turns and your climb and descent angles. It also helps you sort out your position in the heat of combat. As in real aircraft, the aircraft symbol is fixed, while the horizon moves and titlts with the movement of the real horizon outside.
Altimeter (ALT)
This is the large dial on the right. The pointer rotates once every thousand feet. Hundred feet intervals are numbered round the dial. The digital ALT display shows aircraft altitude in thousands of feet.
Airspeed indicator (ASI)
This shows indicated Airspeed (IAS) in knots (nautical miles per hour, 100 knots = 115 mph). Readout is digital AND shown on pointer. At ground level IAS is the same as True Air Speed (TAS). At altitude the air steadily thins out so actual TAS is higher than IAS. However, the aircraft's wing 'feels' IAS so this is more useful to the pilot.
Mach Meter (MAC)
Under the ASI, this shows speed in terms of the local speed of sound. 1.0 is around 670 knots at ground level and drops with temperature. At 40000 feet it's very much colder (-60 C), this combined with the thin air gives you around 300 knots IAS at Mach 1.0. Mach 2.3 at 40000 is just under 700 knots IAS but this is a true speed of over 1500 MPH!
Compass (HDG)
Under the artificial horizon is the compass, showing the direction the aircraft is pointing. This is known as the heading (HDG). All compass directions are measured as 'degrees clockwise from magnetic North, 360 altogether. North is 000, East 090, South 180, West 270.
RMI (Radio/Radar Magnetic Indicator)
This display under the digital compass is a white pointer pointing at the runway radio beacon, or pointing under radar control at the target aircraft. The digital compass bearing (BRG) to reach the objective is also shown, as is the range in nautical miles. When target is active target altitude is shown continuously in thousands of feet. When pointing at the runway, the bearing and distance information corresponds to 'Tacan', a military Tactical Air Navigation aid.
Afterburner (BNR), Engine RPM, Airbrake and Wheelbrakes (BRK)
These functions are indicated in a combined vertical strip indicator to the left of the ASI. With the BRK light on wheel/airbrakes are on and engine thrust is at flight idle. As thrust is increased the brakes are released, increasing to maximum thrust lights the afterburner BNR (high thrust with increased fuel consumption).
Fuel, Flap, Ammunition, Gear, Score, Mode
These are all simple, self evident indicators. Combat CBAT mode will stay indicated once acquired, even when returning to a field to refuel and rearm.
Vertical Speed Indicator (VSI)
Vertical speed is to the right of the Artificial Horizon. It shows the vertical speed component as a line.
ILS (Instrument Landing System)
This consists of two indicators: The Glidescope (G/S) vertical strip to the left of the Artificial horizon and the Localiser horizontal strip over the Artificial horizon. The ILS is used to locate the exact centre of the radio beam down to the runway. Each runway has an ILS beam in the main landing direction. This extends for many miles along the extended centre line of the runway, sloping down at an angle of 3 degrees (300 feet per nautical mile), over the 'strobe' approach lights and down to the ideal touch down spot marked on the runway.
The horizontal localiser shows deviations left and right of centre line. The vertical glideslop indicator shows deviations above and below the ideal glidescope. Both work in the demand sense, e.g. if the pointers are showing right and down, FLY more right and down to reach the centre of the beam. As the pointer goes through zero make an adjustment to maintain the centre.
Phantom Controls
All can be easily memorised either by letter, number, symbol, or position in relation to the movement commanded. P/O and S/W keys are available on the ground at zero speed.
| P | Practice (sets training mode, arms formation mode) | |
| O | Operations (sets circuit mode, arms combat mode) | |
| S | & W (over S) adjust Sound Level | |
| 0 | elevator (pitch), ailerons (roll), thrust; all on keys | |
| 1 | single analogue joystick; only thrust is keyed | |
| 2 | double analogue joystick; thrust on 2nd stick (crash resets system to 0) | |
| D | Desensitised key controls (autopilot '.' in MAC window) | |
| E | Enhanced key controls (combat manoeuvring. ':' in MAC | |
| C | Centralise controls in Enhanced key mode | |
| pitch up | SPACE bar | (pull back on main stick) |
| pitch down | H | (push forward main stick) |
| steer/roll left | V | (left on main stick) |
| steer/roll right | M | (right on main stick) |
| < | decrease thrust and brake | (back on stick 2) |
| > | increase thrust and afterburner | (forward on stick 2) |
| R | flaps Retract (over F) | |
| T | gear up (over G) | |
| F | Flaps extend | |
| G | Gear down | |
Special Keys for Formation (FORM) or Combat (CBAT) modes:
| A | Arm gun pods and bring up gunsight |
| Q | Disarm (Quell) gun pods and sight |
| Z or FIRE buttons on sticks | Fire guns |
| L | request Landing field assignment (see Modes) |
Special Keys only in Formation mode, to control target:
| [ | perform half loop and roll (on Electron, = key) |
| * | perform full loop (on Electron COPY key) |
| RETURN | Return target to straight and level flight. Also, so that you can be sure of the reason for chasing, program will not reset until RETURN is pressed. |
Finally, do not forget you can eject, survive and save some of your score by pressing ESCAPE.
Phantom Notes
P for Practice sets up TRNG (Training) mode and arms FORM (Formation) mode. In both these modes, crash and score is inhibited. You can do all sorts of silly things like hitting the ground supersonic and bouncing up again!
TRNG mode is for take off and landing practice in the vicinity of the airfield. All navigation is referenced to the particular landing runway.
FORM is automatically entered and locked in once the aircraft climbs above 12,000 feet, but you can fly lower and stay in FORM. The pointer is now radar driven and locks onto the target aircraft. Target distance, bearing and altitude are computed and shown. Gunpack can be armed (A), fired (Z or fire buttons), disarmed (Q) and target aircraft shot down. Target control keys become available only in this mode. When not used, target will continue/resume flying random 3D patterns for target practice or formation flying.
To re-enter TRING mode you require Landing field assignment conditions:
- Aircraft below 11,000 feet
- Active target over two miles away, and not ahead
- Guns disarmed (Q)
press L, TRING will be entered, pointer shows assigned field.
O for operations sets up CIRC (circuit) mode and arms CBAT (combat) mode. In both these modes crash routine and score is enabled. These are advanced modes.
CIRC mode is broadly similar to TRNG. However, landings are scored and crashes are possible.
CBAT mode is broadly similar to FORM. Kills are scored, crashes are possible. Target control is not available. Enemy aircraft will attack. Own aircraft can be destroyed or damaged in many different ways. Several rounds must hit the target centrally at close range (0.5 mile or less) to kill. To refuel and rearm at the nearest base, press L when field assignment conditions are met. A combat base field will be assigned, runway QDM (see below), wind direction and speed are given, and all navigation is again referenced to the runway. After a successful landing you will be refueled and rearmed.
Flying Basics
Takeoff
Ensure Flap out, desired mode and key/sticks selected. Increase thrust to just short of afterburner. As the speed rises to 150 knots lift the nose and climb away at a shallow angle. Raise the GEAR (T over G) and retract the flaps (R). Gear (wheels) create drag. Raise them as soon as possible. Lower them by about 2000 feet on the approach to improve speed control. Flaps increase lift at the expense of drag, and lower the stall speed. Flaps have a limiting speed at which you will receive a warning tone. Gross exceedence of limits can cause a crash.
Climb
Control the speed around 400 knots in the climb. If speed is high, raise the nose more, if speed low, lower nose. If she's climbing too fast for you, ease back on the power and lower the nose a little. Generally flight at lower power is more 'aircraft-like' while high power is more 'rocket-like'.
Level Flight
Ease the nose down to a level attitude on the horizon, at the same time reducing power to keep a constant speed. Control altitude with small adjustments of pitch (elevator). Control speed with power.
Turning
The more you bank (roll), the more your turn. At steeper angles the nose will tend to drop. Use up elevator (pitch) to counteract this, and notice that this tightens the turn. In steep combat turns most of the turning is done on the elevator. This is known in the trade as 'Yug' due to the heavy 'G' effect. Ailerons on the wings control bank angle.
Descent
Reduce power and lower the nose to maintain a stable speed, adjusting as in the climb.
Approach
Turn towards the field shown on the pointer. Until you are able to 'orientate' (mentally position yourself with respect to the runway 'QDM') it is best to wait until you can see the direction to land indicated by the moving 'strobe' light on the ground. QDM is the old 'Q' code for the compass direction in which the runway is pointing.
Fly to a position about four miles from the runway where you will be exactly 'lined up' with its centreline. Over this point aim to be at 1200 feet, speed 180 knots, gear and flap down, descending at 300 feet per mile towards the runway.
Landing
Close to the runway, reduce power slightly and raise the nose a little to reduce descent rate. Have a last look to ensure the Gear is down! When touched down close power to apply brakes, and keep straight on the runway. If anything goes wrong it may be wise to 'Go around' again by applying power and raising the nose.
Instrument Scan
Keep your eyes scanning the instruments regularly as well as looking outside. Try and anticipate the aircraft's response. This will help you fly more smoothly.
Stalling
This is simply trying too slowly for the wings to keep you up. To recover increase power and lower nose.


