Click Here To Go To The WL Services Archive


-
%SHOW_TITLE%

Cover Art


Easy Banker


Easy Banker


Easy Banker

Introduction

This program has been written to produce accounts which can be easily maintained and printed out either on a screen or printer. The body of the program consists of two menus. One handles standing orders and the other handles other transactions and opens and edits accounts.

Before these menus are entered however you will first be required to enter the date. Throughout the program, dates should be entered as three numbers separated by a choice of three symbols - . or / as indicated. Generally, these separators should not be mixed as they may not be recognised if they are. The program will check to see if the date is valid and if not you will have to enter another.

Once a valid date has been entered, you will be asked to enter the drive number for the data disc. Insert your data disc into the drive you intend to use and press the appropriate number. You may, if you wish, use the program disc for your data but we suggest that you use separate discs. When using any disc for the first time you will have to open the first account.

The program will give a catalogue of the disc in the drive to enable you to select the disc you wish to use. If you change the disc to one with data files on they you will proveed to the standing order menu for which the program disc must first be in drive 0. If you do start a new disc the account screen will be displayed for you to edit.

Opening Accounts

For the account screen, only two fields can be changed. The account name and the starting balance. The cursor '>' can be moved up and down between these fields using the cursor keys. With the cursor pointing to the field required, simply enter the new name or starting balance. When these have been set up with the name and balance you want press ESCAPE to go on to the standing order menu.

This procedure is the same for every account you wish to open.

The Standing Order Menu

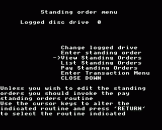
Generally, once the date has been entered you will wish to bring any standing orders or other regular payments up to date. So the program starts with this menu. To select items from the menu, simply move the cursor ']' up and down the screen with the cursor keys and press RETURN to select the function which the cursor indicates.

The actions of each of these functions are as follows:

Change Logged Drive
This option will enable you to switch to another disc provided that that disc has data on it. If you wish to change discs but use the same drive then you should still use this option but enter the same drive number so as to initiate the new disc.

Enter Standing Order
When this function is selected, the program presents on screen a standing order with the amount and details empty, but with the starting and finishing dates set to today's ate and to 'none' respectively. The usual cursor '>' is displayed on the screen pointing to the description.

To enter the details of the standing order you require, move the cursor around the screen and type in the values you want. The payment or receipt conditions can be interchanged by pressing any key. The account number on which the standing order is paid can be changed (up to the number of accounts on the disc) by entering that number.

The payment period is selected by positioning the cursor against the case required (Annually, monthly or weekly) and then entering the number of months or weeks. Annual payments are set to a period of one year, although you may enter periods of 24 months, etc.

The third option in the list, 'Set week of month', is for payments made, for example, on the third Friday of every month or the last Friday of every month, where the payment period can be four or five weeks. For cases such as this, enter the first payment date as the third Friday and the payment period as 3rd week of every month. Thereafter the payment or receipt amount will be entered on the third Friday of every month.

The starting and finishing dates are entered using the same formats as for entering today's date, except that the finishing date may be set to 'none' if there is no such date known. The advantage of using the finishing date is that where regular payments have a limited time, such as hire purchase repayments, then the computer will stop entering the payments after the last date.

When the standing order has been set up as required, press ESCAPE to enter it.

View Standing Orders
The View Standing Orders routine presents each standing order on screen in the format of the Enter Standing Order routine so that they can be reviewed and, if required, amended. The amendment is done using the cursor keys and entering the values in the same way as the standing orders are entered.

Standing orders can also be deleted if they no longer apply.

List Standing Orders
Standing orders can be listed out either on the screen or on the printer for easy reference.

Pay Standing Orders
Payment of the standing orders and other regular transactions is carried out by this routine. If there are a lot of regular payments or this routine has not been run for a long tiem then this may take quite some time. A message will appear on the screen saying 'Paying Standing Orders. Please Wait'. When the orders have all been paid you will be given the opportunity to innsert and select another disc so that all your data discs can be updated at once.

Enter Transaction Menu

This option transfers you to the main program menu. When it is selected you will be told to place the program disc in drive 0 and press a key. If you have more than one drive you can leave the program disc in drive 0 and simply press a key at this point.

Close Down

Always exit the program via the Close Down menu. This prevents any files being left open and will compact the data disc to ensure that there is space to edit the data. This option also exists in the Transaction Menu.

The Transaction Menu

The Transaction Menu is very similar to the Standing Order Menu except that the account number can be changed by entering a new number with the cursor pointing to the existing one, and the disc drive number is also changed by positioning the cursor with the move left ']' key and pressing the new drive number.

If the disc in the new drive does not contain any data files then you will be given the opportunity to open an account on the disc in the same way as when you first use the program. Alternatively, you can use the Initialise New Disc procedure at the top of the menu options to create a new disc in the current disc drive.

The Close Down option at the bottom of the menu is the same as the Standing Order Menu Close Down option. Similarly, the standing order menu transfers control back to that menu enabling easy movement between the two. New accounts can be opened by the Open Account routine where the account name and stadrting balance are entered in the same way as previously described.

Existing accounts can be viewed and deleted or edited with the following option and an account list can be printed out on a printer or the screen. If while viewing the accounts you delete all of them then you will have to open a new account before proceeding.

Enter Transactions
To enter transactions a standard screen is presented, giving the account number and name on which the transaction will be made and the current balance on that account before this transaction. These features cannot be changed on this screen. The screen also shows the date of the transaction (initially showing today's date), whether the transaction is a deposit or withdrawal, the amount of the deposit or withdrawal, and a couple of lines to enter details such as who the amount is to or from or a cheque number. The screen also displays the account balance after this transaction.

When the payment is set up as required, pressing ESCAPE will enter it and adjust the new balance. If there are any more transactions then you can go on to enter these.

View Transactions
Transactions can be reviewed and deleted, or edited using the same screen as for entering transactions, just as accounts and standing orders can be edited. If the dates of transactions are edited (say to make them agree with a bank statement) then they may no longer be in date order. They may be resequenced from the List Transactions option which puts the deposits and withdrawals into date order before listing them.

List Transactions
For the List Transactions option, the program disc must first be placed into drive 0. After a key is pressed and some delay, the list screen will be displayed. This presents the features of the list routine, which are as follows:

The current disc drive is displayed, which can be changed if another data disc is required.

The account number and name are displayed, which can also be altered by entering a new account number to select the account required.

Starting and finishing dates are given, so that the listing can be given between set dates, or deleted between set dates.

Whether a printout is to be produced is indicated as is whether the listed transactions are to be deleted.

The advantage of the Delete Transactions option here is so that old transactions (before a certain date) can be deleted from the accounts but a printed copy of them can still be kept.

Indeed if they are entered out of date order, then up until now they will remain so. Therefore, at this point the transactions are sorted into date order. As this may take some time, a message appears on the screen asking you to wait. If there are only a few transactions on file or if they are already in the correct order this should not take too long.

After the transactions have been listed out, ensure that the program disc is in drive 0 and press any key to return to the menu.

Disclaimer

Although every effort has been made to ensure that this program will meet as many demands as possible, you should ensure that it is sufficient for your own requirements before committing its use in practice. While we would welcome any comments on the program, no liability can be accepted for any loss caused by the use of this program, howsoever caused.

Screenshots

Cover Art Language(s): English
Compatibility: BBC Model B, BBC Model B+, BBC Master 128, Acorn Electron
Release: Professionally released On Cassette
Original Release Date: 1st Jan 1984
Links: Everygamegoing,

Cover Art

Downloads

Easy Banker (5.25" Disc)