
Introduction
ELECTRO-ART by David Mendes includes a full machine code "PAINT" routine that allows you to "colour fill" any shape.
ELECTRO-ART allows you to draw lines or shapes directly onto the screen to enable you to create your own works of art. You will be able to use all of the sixteen colours in Mode 2, plus many other features,
including saving the picture to cassette for reloading at a later time.
ELECTRO-ART can be as simple or as complex as you want it to be, catering for the serious artist or the absolute beginner.
All the displays and questions within the program are very easy to follow and provision has been made for incorrect answers.
To assist you running the program for the first time, here is a complete step by step guide through the program.
Operating Instructions
Make sure the CAPS LK/FUNC key is on all the time whilst running the program.
To load the program, simply type CHAIN"" (RETURN)
After the first two small programs have loaded, the main program will start to load. The main program will not function correctly unless you always follow this sequence.
The first question the program will ask is the colour of the paper you want to use. A choice of eight colours is available and the relevant keys are:
Key "R" is red
Key "G" is green
Key "Y" is yellow
Key "B" is blue
Key "M" is magenta
Key "C" is cyan
Key "W" is white
Key "K" is black
Next you will have to decide the colour of ink you want to start with.
The colours available and the keys are the same as above.
The ink colour can, of course, be changed at any time whilst creating your picture. After entering all your answers, the screen will now display your chosen paper colour, a flashing square, and the words "USING CURSOR". These words will be displayed in your chosen ink colour. A letter "P" will also be seen. This will be discussed shortly.
Drawing Controls
Using the following keys you will be able to move the cursor around the screen and draw lines:
Z - Left X - Right * - Up ? - Down
It is also possible to press two of these keys together to produce
diagonal lines. Also note that the program allows full screen wraparound i.e. if you go off the screen at any point (top, bottom, left or right), the cursor will reappear at the opposite side. This will be found to be extremely useful, allowing you to move rapidly to opposite sides of the screen.
To change colour of ink, simply press any of the eight colour keys previously mentioned. The bottom display line will then indicate the change by assuming the new selected colour.
Flashing Colours
Extra to the eight ink colours you also have "FLASH".
Key "F" flash on
Key "O" flash off (Letter O, not zero)
This will perform flashing lines or shapes, in the opposite ink colour selected. (See User Guide for details on flashing colours and their attributes).
Another key to be used is "I". ("I" means invisible). Key "I" will make any future lines invisible. This will be found necessary when you want to move the cursor from one point to another, without leaving a line.
Once into "invisible" mode, a letter "I" wil be displayed to advise you
of your selection. Pressing any of the colour keys, or key "F" or key
"O" will return you to the chosen ink colour and the "I" will be removed from the display.
What about that "P" in the display?
OK, let's discuss that. There are two other modes. They are "PAINT" and "DRAW".
The program always starts in "PAINT" mode, hence the "P". These two modes are switchable and can be selected by:
Key "P" paint
Key "D" draw
These two modes are used in conjunction with seven of the nine predicted shapes built into this program. The predefined shapes are drawn by pressing the SHIFT key.
The choice of which predefined shape is drawn, is selected by the following keys, prior to pressing SHIFT:
Key "1" colour fill routine (Discussed shortly)
Key "2" square (default when program starts)
Key "3" rectangle
Key "4" triangle 1
Key "5" triangle 2
Key "6" triangle 3
Key "7" triangle 4
Key "8" horizontal line
Key "9" vertical line
Circles will be dealt with shortly.
Modes "PAINT" or "DRAW" will have the effect of presenting the selected predefined shape, either filled in (PAINTED) or outline only (DRAWN).
Colour fill (key 1), the horizontal line (key 8) and the vertical line (key 9) will not be affected by the "PAINT" or "DRAW" mode.
Circles
The circle routine within this program is extremely flexible, allowing you to draw circles in any colour, at any size, at any position on the screen, and they can be presented in any of three different modes.
The keys used for producing circles are "0" and "-" (zero and minus sign).
Key "0" start of circle routine
Key "-" end of circle routine
Just to make things even more exciting, within "DRAW" there are two further modes, "TRUE" and "ABSTRACT" which can be utilised for the drawing of circles.
Key "T" true
Key "A" abstract
The following example will clarify this function.
These two modes are only available for the circle drawing routines.
Try them out and see!
| Example: | |||||||||||||||||||||
| Press "D" Press "0" |
Display reads: "DT" (for "DRAW" "TRUE") and the message says "GO TO RADIUS LENGTH". In other words, you have been requested to move the cursor from its current position which is equal in distance to the length of the radius of the desired circle. | ||||||||||||||||||||
When the cursor is in position, press "-". The circle will be drawn to the required size.
This sequence will automatically put you into "INVISIBLE" mode. This will happen regardless of whether you have previously selected "INVISIBLE" mode or not.
Repeat the above example in different modes and colours. Firstly, try "PAINT" mode and then try "DRAW" "ABSTRACT" mode. "DRAW" "ABSTRACT" will produce an abstract circle.
Note: Pressing "-" before "" will have no effect.
Once the "0" key has been pressed to start the circle routine, all other keys will be disabled for safety, until the "-" key has been pressed to complete the function.
Some interesting effects can be obtained with these features.
Two more keys that will be found invaluable are "<" and ">" (Don't use the SHIFT key with these two.)
These two keys allow you to draw straight lines in any direction, in any colour, with your given start and end points.
Example:
Use "INVISIBLE" (if required) to position the cursor at the point where you want the line to start.
Select your desired colour (if not the current colour in use).
Press "<" key (Remember, don't press the SHIFT key as well!)
Display reads: "DRAW LINE TO WHERE".
The program has now automatically put you into "INVISIBLE" mode.
It has also stored your current position and you can now position the cursor to where you want the line to end.
With the cursor now in position at the end of the desired line, press ">" and the line will be drawn in the current ink colour.
You may now continue drawing in the normal way.
Note: Once the "<" key has been pressed, all other functions will be disabled for safety, until the ">" key has been pressed to complete the line drawing routine. Pressing the ">" key, without first pressing the "<" key will have no effect.
Key 1 Colour Fill Routine
Select invisible if required and position the cursor towards the centre of the shape to be filled.
Select your chosen colour if not already selected.
Select key 1 (colour fill) if not already selected.
Press SHIFT and the shape will be filled in the chosen colour. Pressing the SPACE bar will have the effect of terminating the "colour fill" routine prematurely.
Some other keys to mention are: "E" "L" "S" and "Q".
Key "E" will allow you to erase the picture completely, but accidental pressing of the "E" key has been catered for by an operating response being required to confirm this selection.
Key "L" will allow you to load a previously stored picture from cassette. Once you have seleted this function you will be asked to enter the name of the picture you want to reload (max 9 characters). All variables, from the time of saving the picture, will also be reloaded. This means you will be in exactly the same position, with the same colour paper and ink, and with the attributes of the saved picture will be restored into the machine, and these will override your current attributes. (Colour of ink and paper, etc.)
Key "S" will allow to save a picture to cassette. As with the load function, you will again be asked to enter a name for the picture you are about to save (max 9 characters). A tone is emitted, as a prompt to all subsequent operator action that will be required. Reply "Y" or "N" as required.
Both the load and the save functions will issue a "STOP THE TAPE" message after the picture has been loaded or saved. Once the tape has been stopped, pressing the SPACE bar will return you to normal operation.
Note: If you require to terminate either a "load" or a "save" routine, at a point when the cassette player has started, pressing ESCAPE will terminate the function and return you to normal drawing mode.
The final key is "Q". This clears the screen and takes you back to the first question in the program. This can be used at any stage, to change the paper colour if you have selected it incorrectly. However, be warned it does clear the screen completely and restart the program.
All the keys "E" "L" "S" and "Q" are protected against accidental use, by a second, or sometimes even third, operator responses required and "N" for "NO" will always take you back to where you were.
Whilst drawing a picture, the ESCAPE key has also been disabled for safety.
At the end of these instructions you will find a list of all the available keys and their uses. Have it by your side when you first use the program, because it was decided not to display the keys used on the screen, as this would have utilised valuable drawing space. After all, drawing is the main priority of this program.
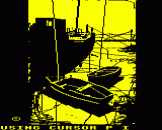
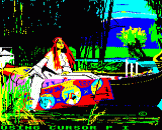
This cassette contains the program ELECTRO-ART, plus three example pictures ready for you to reload. The examples are called:
| 1. | BOATS |
| 2. | BBC |
| 3. | LADY |
Available Keys
| Key 1 | Colour fill routine |
| Key 2 | Square |
| Key 3 | Rectangle |
| Key 4 | Triangle 1 |
| Key 5 | Triangle 2 |
| Key 6 | Triangle 3 |
| Key 7 | Triangle 4 |
| Key 8 | Horizontal line |
| Key 9 | Vertical line |
| R | Red |
| G | Green |
| Y | Yellow |
| B | Blue |
| M | Magenta |
| C | Cyan |
| W | White |
| K | Black |
| F | Flashing On |
| O | Flashing Off |
| I | Invisible (Return to normal with colour key or F or O) |
| 0 | Start of circle routine (zero) |
| - | End of circle routine (minus sign) |
| < | Start of line draw sequence |
| > | End of line draw sequence |
| J | Joystick Control (See note below) |
| H | Cursor Control |
| P | Paint |
| D | Draw |
| T | True |
| A | Abstract |
| E | Erase picture |
| L | Load from cassette |
| S | Save to cassette |
| Q | Quit and start again |
To end program, switch off machine.
Note: Future expansion of the Acorn Electron will possibly cater for the inclusion of a joystick interface. This program was originally designed on a BBC Microcomputer which has this joystick interface. The Electron version of "BEEB-ART" has retained this 'joystick software'.
At the present time, Acorn Computers are unable to release the specification for any future expansion on the Electron, but they inform us that a joystick interface may be released soon, and will most probably be the same as that fitted to the BBC Microcomputer.
If that is the case, then the joystick function within ELECTRO-ART will
operate correctly on the Electron. However, Quicksilva cannot accept responsibility for the correct operation of this "untested" function.


