Introduction
Mousepaint is a comprehensive but introductory design and graphics package written for the Acorn Electron for use with a Trackball or Mouse supplied by Wigmore House Ltd, or AMX.
The range of commands and options are selected by moving the cursor to a menu of icon symbols which graphically represent the options.
The software operates in Mode 1, which permits four attractive colours out of a choice of eight with good resolution. Although a black and white screen can be used, the designs and pictures clearly appear more attractive and striking if a colour screen is available.
Once the designs are complete, they can be stored on and recalled from cassette or floppy disc - 40 or 80 track. The pictures can also be output to an Epson dot matrix printer.
The minimum specification is as follows:
| 1 | x | Electron computer | |
| 1 | x | Trackball or Digital Mouse | |
| 1 | x | Cassette or disc drive | |
| 1 | x | Monitor or TV |
The dot matrix printer is optional.
Setup
Plug the Mouse into the Project Expansions' User Port, or Trackball into the ADC port on the Plus 1.
Switch on.
Cassette
Type CHAIN"" (RETURN)
and then switch on the cassette player. After the first few blocks, a title screen will appear and then load the main program.
Function Keys
| f0 | - | Toggle switch to remove and recall icon grid (eg. for printing and photography) |
| f1 | - | Printer (confirm Y on keyboard and press RETURN) |
| f4 | - | Toggle between Mouse and Trackball |
| f5 | - | Blue or Black |
| f6 | - | Red or Magenta |
| f7 | - | Green or Cyan |
| f8 | - | Yellow or White |
Icon Grid
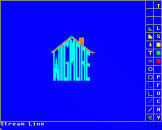
There are two rows of icon symbols on the far right of the screen. The far right column represents commands. The inner column represents the various drawing options that can be used in conjunction with the commands.
Mouse Operation
The Mouse operates through the Project Expansions' User Port. A digimouse, megamouse, or AMX type of digital mouse is compatible.
The cursor will move on the screen in response to the movements of the mouse. Pressing the left hand button will enable drawing.
Commands
T or M indicates whether the software is set to Trackball with data coming from the analogue port, or the Mouse via the User Port.
| Load. | This command loads a picture or shape from disc or tape to a predefined location on the screen. The system will request �Picture name for saving�. The name of a picture already saved should be keyed in, followed by RETURN. | |
| Save. | This saves a picture, shape or component to disc or tape.
On initiating this command, the system will state 'Save � Cursor Top Left'. This means position the cursor to the top left of the shape to be saved and press the button. Then drag the cursor to the bottom right. A 'rubber rectangle' will appear which should enclose the shape to be saved. At this moment, press the button again to confirm. 'Picture name for saving' will appear. Type in the name of the picture to be saved followed by RETURN. |
|
| Colours. | Although Mode 1 on the Electron only permits four colours at a time, does allow a choice of those colours from a range of eight. These are changed by using the function keys as previously listed.
The cursor can pick up any of these colours to be associated with any of the drawing options or background colour (paper). |
|
| Paper. | This changes the background colour of the screen.
P should be initiated followed by the required colour. Care should be taken that the drawing colour is not the same as the background. |
|
| Instant fill. | This command is used in association with drawing options. Circle, square and ellipse will cause those shapes to be created on the screen - already filled in the current drawing colour. | |
| Outline. | This will ensure that the above drawing shapes only appear in outline. | |
| Clear. | This will clear the whole contents of the screen. It will ask for confirmation Y/N. |
Drawing Options
| Hatch Fill. | This fills a regular or irregular outline shape with hatch lines.
The colour may be different to the outline colour. Irregular shapes may require several touches to complete the fill. |
|
| Fill. | This is a subsequent fill working in a similar way to hatch except the fill is solid. | |
| Paint. | Permits the cursor to be treated as a free moving paint brush.
Although performing in a similar way to stream mode, the thickness of the brush is selectable. Move the cursor under the bottom line of the frame and by moving it horizontally, the thickness of brush can be seen to alter. Press button when thickness is correct. Move cursor to correct position, then press button to create paint brush effect. |
|
| Text. | 'Enter Text' will appear at the bottom of the screen.
Type in up to 23 characters per line, followed by RETURN to indicate the end. Position corner to correct position on screen for the beginning of text. Press button. |
|
| Ellipse. | Three button depresses are required; the center point, horizontal point, and finally the vertical point.
Colour, outline and instant Fill will depend on the associated commands. |
|
| Circle. | The first button depression will represent one corner of the rectangle. Move the cursor in any direction and the rectangle will change in a flexible manner.
When correct, press button for the second time. |
|
| Corrected Dotted Line. | Move cursor to beginning and end of a vertical or horizontal straight line, combined with use of mouse buttons.
The lines will be automatically corrected to be exactly vertical or horizontal. |
|
| Corrected Line. | This drawing option is the same as above except that the line will be continuous instead of dotted. | |
| Dotted Rubber Line. | A dotted line can be drawn to any position and any angle.
After initiating the start, the line will be flexible while moving the fixed point to the correct position. This can be useful for perspective and hidden detail as well as general design. If the line would immediately continue at a different angle, press the button twice. Once to represent the end of the line, and a second time to indicate the beginning of the next line. |
|
| Rubber Line. | Same as above but a continuous rather than a dotted line. | |
| Stream Line. | This is freehand sketch mode. A line will be drawn following the cursor while a button is being depressed. This is Mousepaint's default mode. |
Note: Although this software will work well with a standard Electron, speed and therefore ease of use will be improved upon the fitting of a 'TURBO' board.
| ICON | FUNCTION |
| Indicates that the software is set up to use a mouse connected to the User Port. "CAPS" & 4 will change this to T. | |
| Indicates that the software is set up to use a mouse connected to the ANALOGUE PORT. "CAPS" and 4 will change this to M. | |
| LOAD. Loads a picture from cassette or disc. When the program asks for the name of the picture, the name must be entered from the keyboard and ended with RETURN. | |
| SAVE. This saves part or all of the screen to disc or tape. On selecting this function the system will indicate "SAVE-CURSOR" "TOP-LEFT". Move the cursor to the top left of the area yo be saved and press the centre button. Now move the mouse until the rectangle thus created encloses the area to be saved. A further press of the centre button will fix the rectangle in place. The system will now request a name for the picture. Type in a suitable name and then press RETURN. When saving is completed, the rectangle will be removed. | |
| COLOURS. In Mode 1, the computer can only display four colours at a time from the range of 8 available. The menu of colours can be changed using both the "CAPS" key and the 5, 6, 7 or 8 keys. The cursor can select any colour from the menu to be used as the drawing colour or the backgroun or "PAPER" colour. | |
| PAPER. This causes the next chosen colour to become the PAPER or background colour. Do not use the same background and drawing colours as sections of your drawing may be lost permanently. | |
| FILLED SHAPES. When selected, CIRCLE, SQUARE & ELLIPSE chapes will be drawn already filled with the current drawing colour. | |
| OUTLINE. Causes the drawing shapes to be drawn in outline only. | |
| CLEAR. Clears the screen but only when confirmed with "Y". | |
| NO. Cancel function. | |
| YES. Confirm function. |
Note: The Menu & Frame can be removed (or replaced) from the screen by use of "CAPS" & 0 (nought) keys operated to allow full screen operation.
| ICON | FUNCTION |
| HATCH FILL. Fills shape with hatch lines in the drawing colour. Note that irregular shapes may need more than one try to fill. | |
| FILL. As "Hatch Fill" but uses solid colours instead of lines. | |
| PAINT. A "freehand" paintbrush option which paints in the currently selected "drawing colour" when the mouse is moved. The thickness of the brush may be altered by first moving the cursor below the bottom of the screen frame and then moving to the left or right. The thickness selected is indicated by the block on the right of the screen. Press the button to confirm. | |
| TEXT. On selection the message "ENTER TEXT" will appear at the bottom of the screen. Type in up to 23 characters and press the RETURN key. Move the cursor to the point chosen for the start of the text and press the button. The text will appear. | |
| ELLIPSE. Three button depresses are required to define ellipses. First select the centre position and then the horizontal size and finally the vertical size. The ellipse will then be drawn. | |
| CIRCLE. The first button depress will fix the centre point. The second being any point on the circumference of the circle. | |
| RUBBER RECTANGLE. First press the button to fix one corner of the required rectangle then move the cursor to the position of the opposite diagonal corner and press again to fix the shape in position. Whilst you are moving the cursor, the rectangle will be drawn temporarily as an aid to positioning the shape. | |
| CORRECTED DOTTED LINE. Pressing the button once for each end of a required line will cause a "dotted line" to be drawn with its horizontal and vertical position fixed by the first point and only its length defined by the position of the second. | |
| CORRECTED LINE. As "corrected dotted line" but unbroken lines. | |
| DOTTED RUBBER LINE. Draws a dotted line from the first point to the second point selected but displays the line whilst the cursor is being moved to the second point as an alignment aid. | |
| RUBBER LINE. As "dotted rubber line" but using unbroken lines. | |
| STREAM LINE. As "paint" but using a single pizel wide line for finer detailed drawing whilst the button is held depressed. |
Picture Printing
By pressing "CAPS" and 1 on the keyboard, the system will be made to display the message "PRINTER Y/N". Replying "Y" will start printing and replying "N" will cancel the message and return to normal operation.


